
넘파이
넘파이로 데이터를 열어서 이미지 분류하기
- 데이터 로드
import numpy as np
import tensorflow as tf

# 데이터 다운받는다.
DATA_URL = 'https://storage.googleapis.com/tensorflow/tf-keras-datasets/mnist.npz'
path = tf.keras.utils.get_file('mnist.npz', DATA_URL)

with np.load(path) as data:
    train_examples = data['x_train']
    train_labels = data['y_train']
    test_examples = data['x_test']
    test_labels = data['y_test']

# open -> __exit__
# load -> source 확인하면 어떻게 닫히는지 알 수 있다.
keras.utils
- to_categorical
- get_file: url 주소로부터 데이터를 가져온다.
pickling
- 객체를 저장하는 것
- open으로 저장하면 문자로 저장된다. 이러면 객체 고유의 성격을 잃어버리기 때문에 피클링 기법으로 저장한다.
from_tensor_slices / from_tensors
- from_tensor_slices에 있는 holdout/batch 등 데이터셋을 관리할 수 있는 기능들을 from_tensors보다 쉽게 쓸 수 있다.
- Modeling
BATCH_SIZE = 64
SHUFFLE_BUFFER_SIZE = 100

train_dataset = train_dataset.shuffle(SHUFFLE_BUFFER_SIZE).batch(BATCH_SIZE)
test_dataset = test_dataset.batch(BATCH_SIZE)

model = tf.keras.Sequential([
    tf.keras.layers.Flatten(input_shape=(28, 28)),
    tf.keras.layers.Dense(128, activation='relu'),
    tf.keras.layers.Dense(10, activation='softmax')
])

model.compile(optimizer=tf.keras.optimizers.RMSprop(),
                loss=tf.keras.losses.SparseCategoricalCrossentropy(),
                metrics=[tf.keras.metrics.SparseCategoricalAccuracy()])

model.fit(train_dataset, epochs=5)
PIL
PIL로 열어서 이미지 파일로 분류하기
Keras의 기본 이미지 내부 라이브러리가 PIL입니다. 또한 기본적으로 넘파이 포맷입니다.
- 라이브러리
import IPython.display as display
from PIL import Image
import matplotlib.pyplot as plt
import os # image는 경로 처리를 해야한다. (오래된 예시) -> path_lbs가 훨씬 깔끔
import pathlib # 깔끔한 버전
- 데이터 로드
data_dir = tf.keras.utils.get_file(origin='https://storage.googleapis.com/download.tensorflow.org/example_images/flower_photos.tgz', fname='flower_photos', untar=True)

data_dir = pathlib.Path(data_dir)
image_count = len(list(data_dir.glob('*/*.jpg')))
# glob: 원래 파이썬 패키지이다.
image_count
# 3670
# 모든 폴더안에 모든 이미지 가져온다는 것.
- 이미지 파일 분류
PIL은 한국어도 읽을 수 있고 자동 정렬해줍니다.
CLASS_NAMES = np.array([item.name for item in data_dir.glob('*') if item.name != "LICENSE.txt"])
CLASS_NAMES
# array(['daisy', 'roses', 'sunflowers', 'tulips', '민들레'], dtype='<U10')
이미지 데이터의 크기가 다를 때
- resize
- PIL -> Image.open().resize()
- tf -> tf.keras.preprocessing.image.ImageDataGenerator
- crop
- 실질적으로는 crop하는게 더 성능이 좋지만 자동적으로 crop하기가 어렵다.
- ImageDataGenerator
# The 1./255 is to convert from uint8 to float32 in range [0,1].
image_generator = tf.keras.preprocessing.image.ImageDataGenerator(rescale=1./255)
# 어떻게 만들건가 통로를 지정해 준다.
BATCH_SIZE = 32
IMG_HEIGHT = 224
IMG_WIDTH = 224
STEPS_PER_EPOCH = np.ceil(image_count/BATCH_SIZE)
# 뉴런 따라 가는 것이 flow
# directory는 class별로 정렬
train_data_gen = image_generator.flow_from_directory(directory=str(data_dir),
batch_size=BATCH_SIZE,
shuffle=True,
target_size=(IMG_HEIGHT, IMG_WIDTH),
classes = list(CLASS_NAMES))
# Found 3670 images belonging to 5 classes.
# classes 안해도 자동으로 class_indices를 해준다.
# 내가 정해주고 싶을 때 classes를 설정 한다.
# target_size: resize (default값: 256)
train_data_gen.class_indices
# {'daisy': 0, 'roses': 1, 'sunflowers': 2, 'tulips': 3, '민들레': 4}
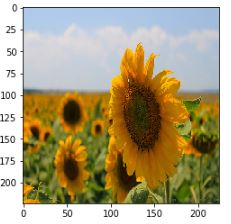
a, b = next(train_data_gen)
plt.imshow(a[0])
- 분류된 데이터 확인하기
## 한국어 설정
import matplotlib
matplotlib.rcParams["font.family"]='malgun gothic'
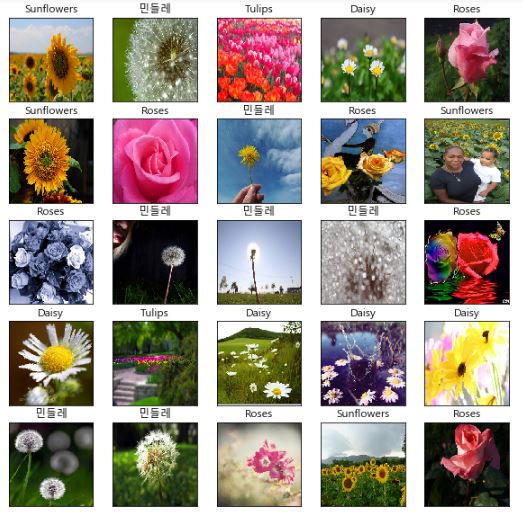
def show_batch(im_batch, label_batch):
plt.figure(figsize=(10,10))
for n in range(25):
ax = plt.subplot(5,5,n+1)
plt.imshow(im_batch[n])
plt.title(CLASS_NAMES[label_batch[n]==1][0].title())
# title: 앞글자 대문자
plt.xticks([])
plt.yticks([]) # plt.axis('off')
show_batch(a,b)
tf.data
- 데이터 로드
# list_files = glob (패턴 찾는 것 )
list_ds = tf.data.Dataset.list_files(str(data_dir/'*/*'))

for f in list_ds.take(1):
    print(f.numpy())
'''
b'C:\\Users\\.keras\\datasets\\flower_photos\\sunflowers\\14741813010_5d44e33088_n.jpg'
'''
- 이미지 파일 분류
def get_label(file_path):
  # convert the path to a list of path components
  parts = tf.strings.split(file_path, os.path.sep)
  # The second to last is the class-directory
  return parts[-2] == CLASS_NAMES
- 이미지 형태 맞추기
def decode_img(img):
# convert the compressed string to a 3D uint8 tensor
# 암호 해석(decode) -> tensor 형태로 가져온다.
# 파일형태를 jpeg로 맞춰야한다. (png)로 바꾸면 안맞아서 안된다.
img = tf.image.decode_jpeg(img, channels=3)
# Use `convert_image_dtype` to convert to floats in the [0,1] range.
img = tf.image.convert_image_dtype(img, tf.float32)
# resize the image to the desired size.
return tf.image.resize(img, [IMG_WIDTH, IMG_HEIGHT])
def process_path(file_path):
label = get_label(file_path)
# load the raw data from the file as a string
img = tf.io.read_file(file_path)
# 문자열 형태 -> tensor형태 이미지를 만든다.
img = decode_img(img)
return img, label
# AUTOTUNE은 밝기와 명암을 자동 조정하는 것
AUTOTUNE = tf.data.experimental.AUTOTUNE
# Set `num_parallel_calls` so multiple images are loaded/processed in parallel.
labeled_ds = list_ds.map(process_path,num_parallel_calls=AUTOTUNE)
# num_parallel_calls=AUTOTUNE: 언제 바뀔지 모르는 모듈이다. -> experimental module
# Autotune: tuning을 자동으로 해주는 것
for image, label in labeled_ds.take(1):
print("Image shape: ", image.numpy().shape)
print("Label: ", label.numpy())
'''
Image shape: (224, 224, 3)
Label: [ True False False False False]
'''
def prepare_for_training(ds, cache=True, shuffle_buffer_size=1000):
# This is a small dataset, only load it once, and keep it in memory.
# use `.cache(filename)` to cache preprocessing work for datasets that don't
# fit in memory.
# keras 구현하는 것
if cache:
if isinstance(cache, str):
ds = ds.cache(cache)
else:
ds = ds.cache()
# shuffle
ds = ds.shuffle(buffer_size=shuffle_buffer_size)
# Repeat forever
ds = ds.repeat()
ds = ds.batch(BATCH_SIZE)
# `prefetch` lets the dataset fetch batches in the background while the model
# is training.
ds = ds.prefetch(buffer_size=AUTOTUNE)
return ds
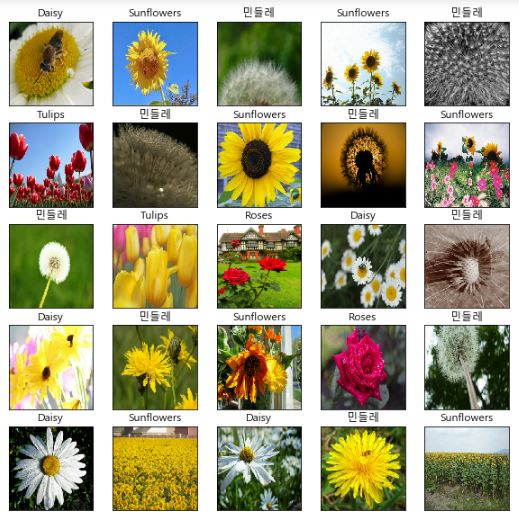
train_ds = prepare_for_training(labeled_ds)
image_batch, label_batch = next(iter(train_ds))
show_batch(image_batch.numpy(), label_batch.numpy())
Comments